Hey Friends!!
Now that Thanksgiving is over are you all ready to dive into Christmas decorating?! I sure hope so!!
I’ve been busy putting up all of our Christmas decor over the last few days and I plan on sharing every last bit of it on the blog! 🙂
I absolutely ADORE this time of year & the coziness of our home! There is just something about the white twinkling lights of the Christmas tree glistening at night that warms my heart! Don’t you agree?!
LOVE it!!
Today I want to share with you this Simple DIY Christmas Wreath that I made for our front door over the weekend……


What do you think?!
I kinda love the way it turned out!
And the best part about it?!
I had most of the supplies already on hand, so it cost very little to make!!
I started with a simple faux evergreen wreath that I already had on hand….

I also had some old ornaments that were falling apart & some little gold accent piece that were on them. I bought a half of a yard of green plaid fabric from JoAnn Fabrics with a 50% off coupon. I think I paid less than $3.00 for the fabric total.

I just cut enough fabric to wrap the ornaments in and used a little hot glue to adhere the fabric to the ornament. You can see that there is a lot of overlapping on the backside of the ornament….that’s no problem!! The side with all the overlapping will be nestled inside the wreath!

I covered 3 of the ornaments using the fabric you see above and then decided that I wanted a little variation in the ornaments, so I went searching in the boys’ closet and found this!

It was an old brown & green plaid shirt that Parker wore a few years ago & it coordinated well with the other plaid fabric I had purchased. So I started cutting the shirt & began covering more ornaments….

Once I had all of the old ornaments covered in fabric, I started just placing them inside the wreath….
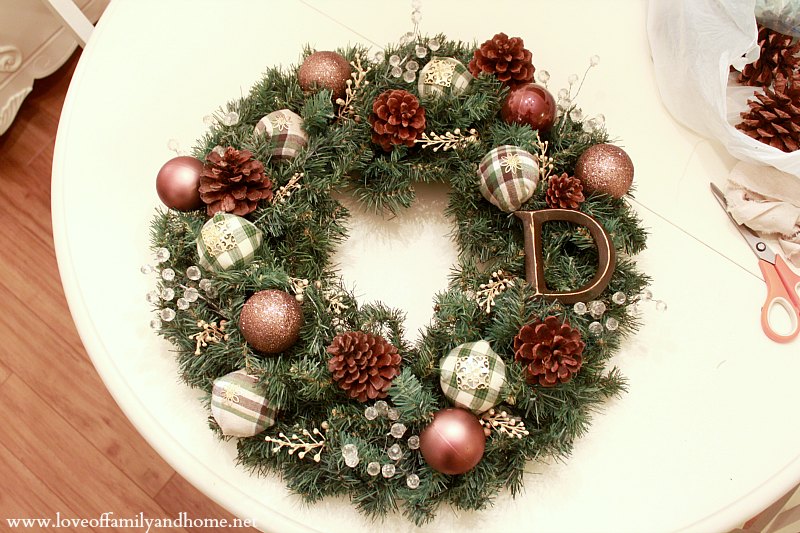
I also started adding in some other accents that I already had on hand including the pine cones, brown ball ornaments, cream berries, & clear beaded sprays. I added the “D” monogram that I purchased at Hobby Lobby. It was originally $3.99, but I used a 40% off coupon….I don’t pay full price for anything! 🙂
Once I had the ornaments & other accents arranged the way I wanted them, I used a hot glue gun to start attaching them to the wreath….

Then I hung it on my front door….

Here is a closer look at the fabric covered ornaments. I used the gold accent pieces that I had & added them to the ornaments just to give them a little bling! 🙂

The various brown ornaments you see randomly place throughout the wreath were ones that I already had on hand. I used them every year in our Christmas decor….

Another full view of the wreath on the front door….

I also made a little Christmas sign to display on our porch that coordinates with my new wreath! I will be posting pictures & a tutorial of it very soon!! They look great together!

I can’t wait to add some greenery & lights to the front porch next!! Hopefully I will be able to reveal the whole space very soon!!
Do you hang a wreath on your door at Christmas time?!
Do you prefer to make one or just buy one?!
If you have made a wreath for your front door & blogged about it, I would LOVE it if you would leave a link in the comments section of this post!
It doesn’t have to be a post from this year either!
You never know…..you might just get featured on this here blog!! 🙂
Linking up here….
One project At A Time Link Party at A Bowl Full of Lemons
Transformation Thursday at The Shabby Creek Cottage
Happy Hour at Crafty, Scrappy, Happy
Grace at Home at Imparting Grace


Too cute, you did a great job! Adorable!
I made mine this year too, cheaper yes. Patience required! =)
Happy holidays,
Brooke
=)
Awesome project, Tonya — I love how resourceful you are! 😉 I’ve done door buckets the past few years, but I’m itching for a wreath this year… we’ll see!
xo Heidi
What a beautiful job you did on that wreath! I love the added fabric and the letter. Thanks for sharing.
It’s beautiful, Tonya! The fabric-covered balls are a brilliant idea. I’m pinning this!
Love the plaid – super cute! Take care, Laura
Ok, you would think even I could do this??? SURELY! Ha! I love that you used one of the boys old shirts! Very innovative sista! It looks fab!
Looks GREAT! Love the whole recycle factor the best : ) Lovely blog : )
The plaid is so cute…I looked for plaid I liked and couldn’t find any…should have raided the boys closet!!! Love your wreath Tonya. XO, Aimee
It is so so cute!! I am so impressed! 🙂
Love, love, love the way your wreath turned out! And to think, you did it with items you already had for the most part! Can’t wait to see what else you’ve done and your home all decked out for Christmas.
This is beautiful! I love the woodsy/elegant look you gave it with the pine cones and the flannel. So fun!
I freaking love this wreath! I love that you have alittle piece of Parker in there ha ha! The part I really love is the D you have on it that really adds to it. Love the colors! Cant wait to see what else is coming keep it going!
Nancy
too cute!! It turned out great! Raygon
It looks so nice! Good for you to use and re-use, love the savings. I found this on Transformation Thursday.
I love to do these type of designs. I t makes a house complete. I went through all and you have creative ideas. You are so talented. Keep up the good work.
Wow, I love the way this turned out!!! So cute.
WOW what a beautiful idea! 🙂 I just bought one this year but you have totally inspired me to make some for other seasons! 🙂 heheeh! thank u
I love this!
Those satin balls you covered remind me of when I was little Thats what we always had on the tree in red,white & yellow!!
My hubby is the flannel shirt king so I’m definitely going thru his closet for some old ones to tackle this wreath!
I love your wreath, Tonya! Love the plaid and pinecones. Just really really pretty!
This is so gorgeous! I love how you used that shirt to create such cute, new ornaments. Totally pinning this! I just recently found your blog and I love it!
Love your beautiful wreath… Found you on a blog hop. I’m a new follower….. I made a wreath too!
Love it! What a great idea and any excuse to use burlap is up my alley! Makes me wish my real live friends were crafters so we could give it a try. Maybe I could hunt some down at one of the craft stores! Thanks for sharing this inspiration!