Tuesday, November 13, 2012

"Bakery Shoppe" Sign Tutorial & A Peek Into My Mom's New Kitchen!


Hey Everyone!

Did you guys have a nice holiday weekend?! We certainly did!!

It was nice to have some extra time to spend with my hubby & with Parker!  We got a lot accomplished as well! We finished up all the renovations in the hallway bathroom & also started another project in the master bedroom that I'm super excited about!! But, because I'm not quite ready to post on either of those topics, I want to switch gears for a moment & share a little project that my mom just finished up!

She is also in the middle of a room makeover.....imagine that! Now you see where I get it?! :)

She has been busy painting her kitchen & also adding some board & batten to the room. I am gonna do a full before & after post on her kitchen when she is completely done with it. Right now, she is still decorating & putting all the little finishing touches in place. She is going with a "bakery" theme which began with her new Creamy, Dreamy Hutch Display several months back. And because every bakery needs some signage, she was quick to whip one up for her kitchen!
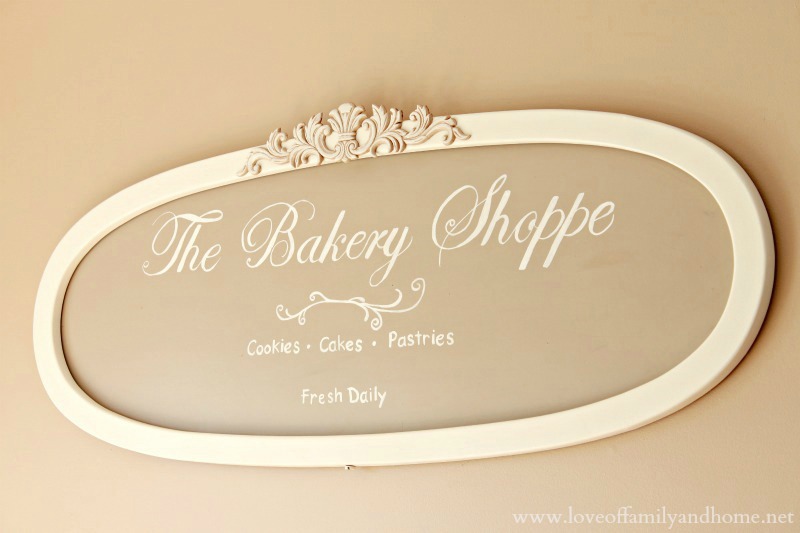


Didn't it turn out SO CUTE?!

I wanted to share a tutorial with you today & show you how you can make one of your own! Are you cool with that?!

Since we don't live in the same house, I wasn't around for every single step of this sign project, BUT I think I can talk my way through the parts I don't have photographed. However, if you find my explanation confusing, you can also refer to this sign tutorial, as it was done in a similar fashion.

Okay...here we go!!

First, she had this old mirror lying around that she wasn't using.


She took the mirror out, so she was just left with the frame....


She then sanded down the frame, primed, & painted it a cream color to match her decor.


For the lettering, she just used Microsoft Word, chose the fonts she liked best, & typed out the wording for the sign. The cursive font is Edwardian Script & the printed font is Comic Sans.


Then, using her projector, she enlarged the words until she got the size she wanted & projected them onto the wall.


Then she hung a sheet of brown paper up on the wall & traced the words onto the paper.


There was a backing on the backside of the mirror that looked like this....


She painted the backing a shade darker than her kitchen walls so there would be a little bit of a contrast. Then once it was dry, she used tracing paper to transfer the lettering from the brown paper onto the mirror backing. Once the words were transferred, she used a small, fine tipped paint brush to fill the letters in with a cream colored paint.

When everything was dry, she placed the backing inside the newly painted frame & hung it on the wall!


The decorative piece at the top of the frame was purchased at Lowes & just hot glued on.

This is a view from her living room, looking into the kitchen....


Everything has turned out beautifully in this space & there are so many cute details that tie in with her bakery theme! I can't wait to share more photos with you! I know you're gonna LOVE it!

Have you made any signs lately?!

I'm thinking about whipping one up for my new bathroom!! I hope it turns out as cute as mom's did! :)


Thanks for stopping by!! Have a wonderful evening!!


Linking up here....
Women Living Well Wednesdays at Women Living Well
Friday Faves Linky Party at Walking in Grace & Beauty
Weekend Wrap-Up Party at Tatertots & Jello

Don't Miss Out - DIY projects, home decorating, crafts & more by checking out my subscribe page

12 comments:

  1. Tonya, that's darling! Your mom did a great job. Easy to see where you got your talent!

    Thanks for the tutorial. So tracing paper is the trick, huh? Good to know. I'm pinning this!

    ReplyDelete
  2. it turned out fabulously and what a great idea!!!!

    ReplyDelete
  3. That turned out so cute! I see where you get all those creative juices!

    ReplyDelete
  4. I love this! Such a cool way to repurpose an old mirror!

    ReplyDelete
  5. Very beautiful and such a great idea. I also love the decorative touch at the top. Thanks for sharing!

    ReplyDelete
  6. Very clever way to get the stencil lettering! I never thought of a projector, awesome!

    ReplyDelete
  7. I totally would have thought you bought this - the lettering looks so great!!

    ReplyDelete
  8. I'm in love! What an adorable sign! I asked for a projector for Christmas...going to pin this for future reference. Thanks for sharing!

    ReplyDelete
  9. This is beautiful and so creative!

    ReplyDelete
  10. The sign is adore but I am absolutley IN LOVE with the wall and trim colors!! Any chance you're willing to share??

    ReplyDelete

I LOVE hearing from my readers and I appreciate every single comment left here! If you have a question...I will do my very best to get back with you ASAP!! If your email address is not linked to your blogger account please leave it in your comment so that I may respond to you! Thank you!!

Related Posts Plugin for WordPress, Blogger...

Get Connected!

Follow By Email

Search This Blog

Loading...

Following Along

Join Our Linky Party

Looking For Something?

Woman's Day Feature

Woman's Day Feature
photo credit: Bjorn Wallander

Visit My Sponsors

Grab Button

Love of Family and Home

Blogs I Love...

Related Posts Plugin for WordPress, Blogger...

Labels

25 things (3) 31 Days to Realizing His Love For You (32) advertise (1) anniversary (1) antiques (1) baby showers (1) backyard (7) bathroom makeover (9) Bathrooms (2) beadboard backsplash (1) beadboard wallpaper (4) before/afters (19) birdhouses (1) birthday (5) Blissdom (3) blog conferences (2) blog design (1) blog housekeeping (1) Blog of the Week (3) blue and coral (1) blue furniture (1) board/batten (6) boys bedroom (2) burlap (3) cancun (1) captivating (2) centerpiece (2) chalkboard paint (4) cherry blossom branches (2) Chicago (1) christmas (7) christmas decor (11) Christmas tree (3) cleaning (2) closet makeover (8) closet office (3) crafts (3) Craigslist dresser (3) curb appeal (10) curtains (2) dining (1) dining room (4) disney (2) DIY Advent Calendar (1) DIY chalkboard (2) DIY fireplace mantel (2) DIY Jewelry Hangers (1) DIY wedding (8) DIY Wedding Centerpieces (2) DIY Wedding Slipcovers (1) DIY Wedding Word Banners (1) dollar store (1) dropcloth (1) easter (9) easter tablescape (2) entry nook (1) etsy shop (15) faith (9) fall (7) family (6) fashion (8) father's day (1) feature (1) Fixer Upper (4) flooring (4) flowers (2) formula cans (1) front porches (3) furniture makeover (7) gallery wall (2) garage (1) garden (1) gift ideas (1) gigispetals (4) girls bedrooms (1) giveaway (24) goodwill (5) guest post (3) hair (2) Halloween (1) Happily Ever Before/After (27) hardwood flooring (1) Haven (1) home goals (1) home tour (2) Hooks (1) house of rose (1) How To Wear Coral Denim (1) how to wear mint/aqua denim (1) hydrangeas (1) inspiration (7) inspire me please (11) InstaFriday (4) inverted stacked bob haircut (2) july 4th (2) kirklands (2) kitchen (9) Kitchen Hutch (1) laminate (1) laundry room (9) Letters (2) life insurance movement (1) living room (2) makeovers (11) mantel (7) master bedroom (5) mint/aqua denim (1) mirror (2) Mixing Coral with Navy (2) Mod Podge (11) mommy's day (1) Monogram (3) month in review (2) mother's day (1) my birthday (1) napkin rings (1) News Interview (2) Numbers (2) nursery (5) old doors (1) Organization (11) ornament (1) outdoor rooms (2) painted rug (2) painting (15) pallet art (1) pantry cabinet (2) parker's room (2) parties (8) pergola (1) photography (45) photography props (1) picmonkey (1) pillows (6) pinkEpromise (1) pinterest (4) planters (1) playroom (1) polka dot bungalow (2) polyvore (1) porch swings (1) Pottery Barn (1) printables (1) re-purposing (1) recipes (22) resale (1) ring bearer pillow (1) Rocking Chair (1) Sarah Richardson (2) seattle (2) shared bedroom (1) shelf vignette (1) shopping (2) shower makeover (3) shutters (2) sick house (1) Signs (5) slipcovers (1) sponsors (3) spray paint (4) spring decor (13) storage (4) stuff (1) styling tutorial (1) summer (2) summer mantel (3) tablescapes (3) teacher appreciation (5) thank you (1) tissue paper pom poms (1) Top 10 of 2011 (1) top blog referrers for 2011 (1) tulips (1) tutorials (30) typography (3) vacations (5) valentine's day (6) valentines day (1) vintage fan (1) vintage toys (1) vlogging (14) wall art (1) wall stencil (1) What I Wore... (12) white walls (1) window boxes (4) winner (1) woman's day feature (2) word banners (1) wreaths (7)
 
Designed by Munchkin Land Designs • Copyright 2012 • All Rights Reserved