Thursday, September 22, 2011

DIY Wedding Card Basket...

The wedding we are decorating for is quickly approaching!! 

We have been busy working on all kinds of wedding projects, but I just haven't had the time to sit down & make a post about any of them. I have shared some other projects in this series a couple of weeks back....if you missed them, you can click here and here.

I wanted to share with you a quick, easy, & cheap project that my mom recently completed.... 


This basket will go the gift table for the wedding guest to place their cards in for the bride & groom!
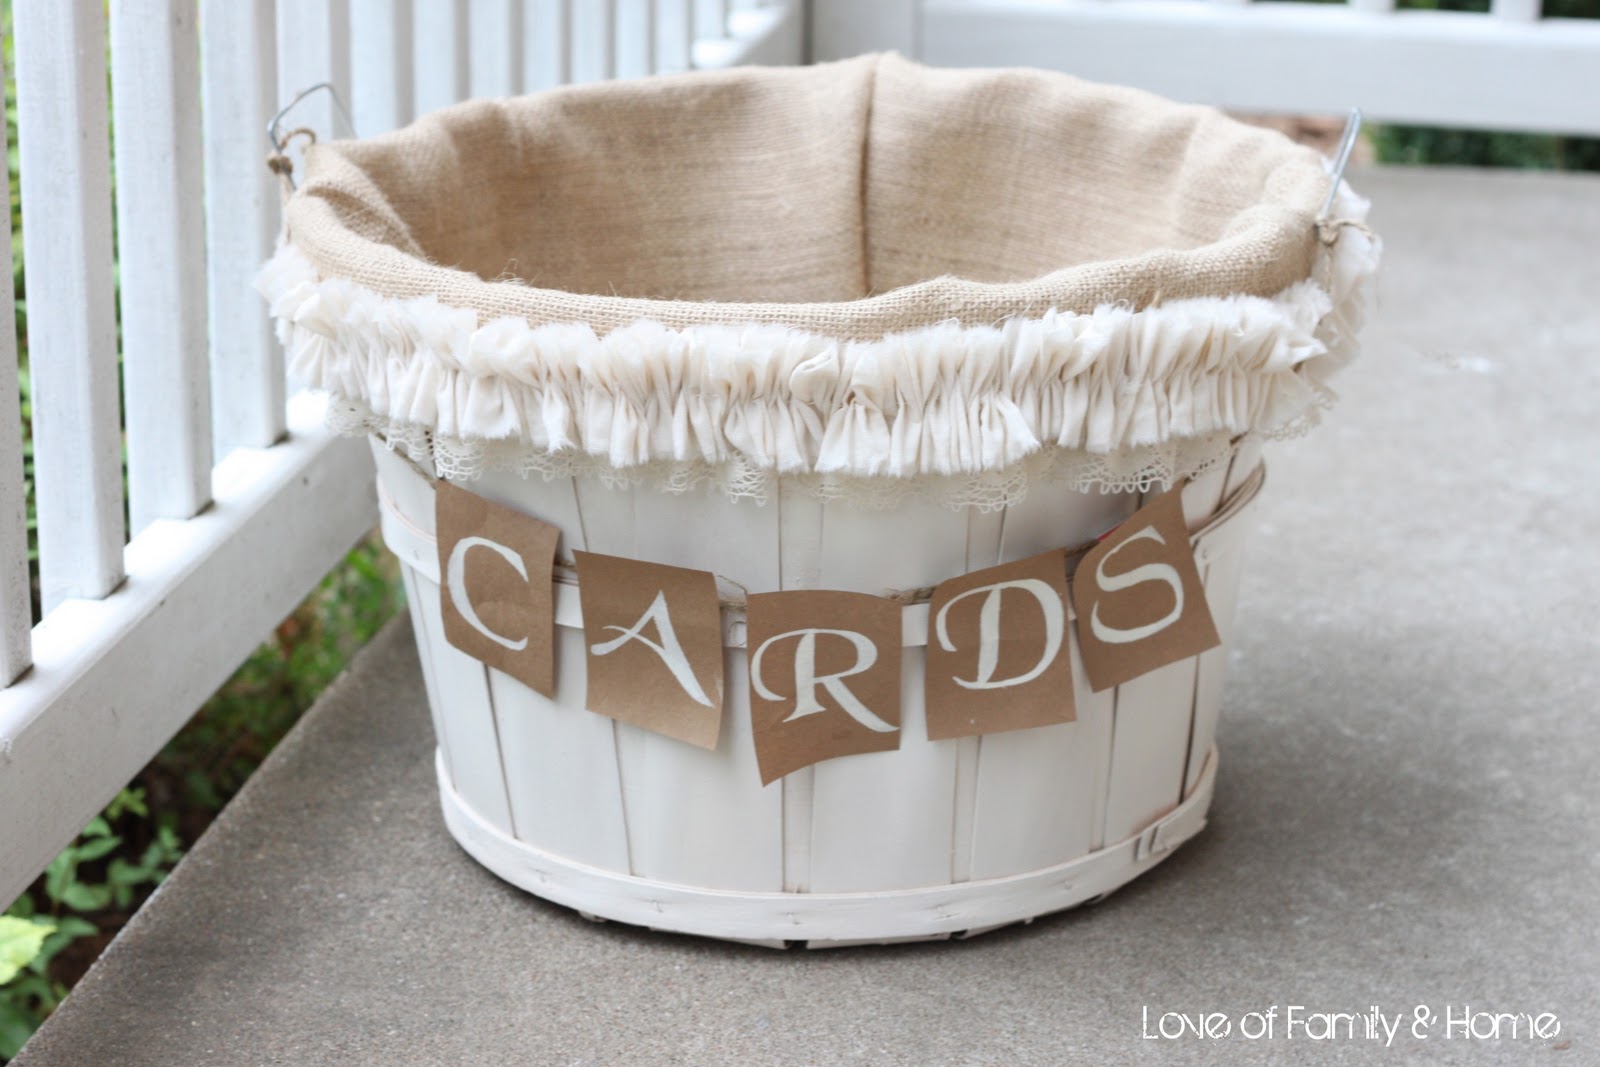
Isn't just too cute?!

Here is how we made it....

We started with a simple bushel basket( like the one of above) that we purchased at Hobby Lobby for $2.50 (50% off) and gave it a new look just by giving it a couple coats of a cream colored spray paint.

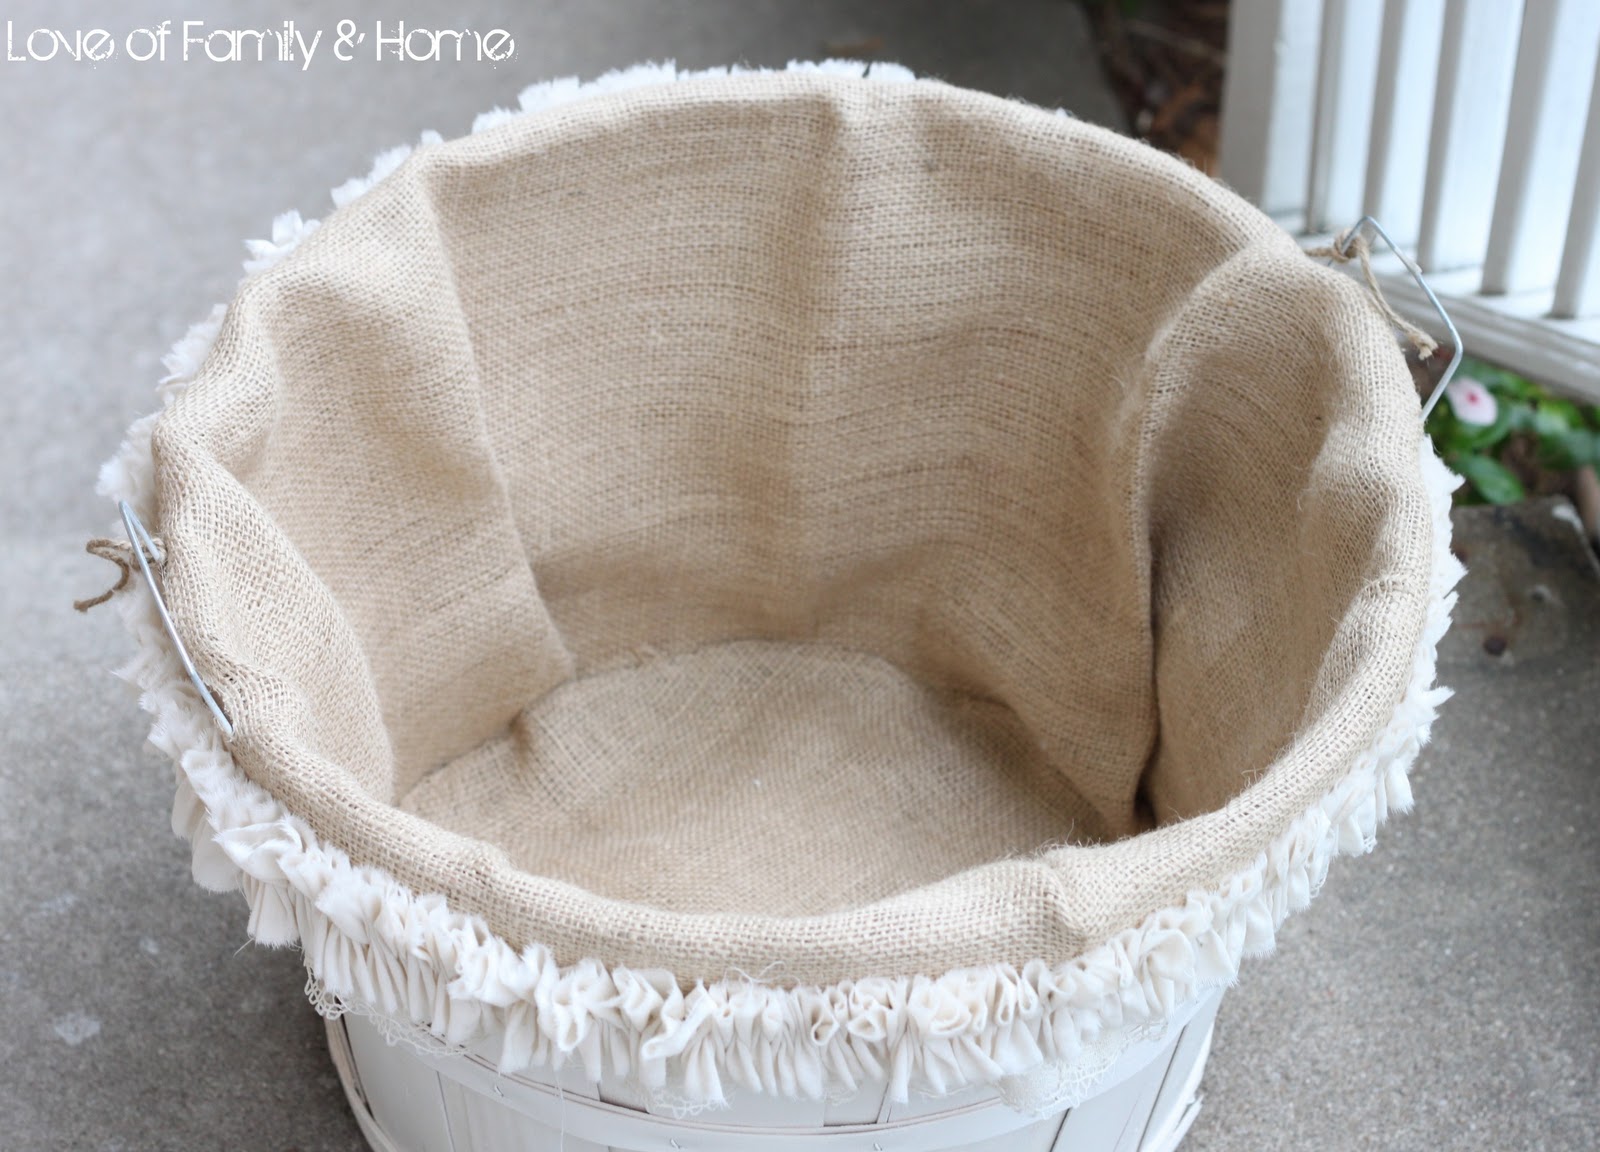
Then my mom made a liner for the basket using burlap.
If you are interested in making a liner here are the steps you need to follow...

1.) Cut a 16.5" x 57" piece of burlap. Measurements were obtained by measuring the diameter & depth of the basket as well as figuring a small amount (approximately 2.5") to hang over the outer edge of the basket. Helpful tip: when cutting the strip use the finished edge of the burlap for the top of the liner so your don't have to hem it later. :)

2.) After cutting, sew together the 16.5" sides. Turn inside out & put inside the basket. You should have around 2.5" that will come over the top edge of the basket.

3.) Because the bottom of the basket is narrower than the top, you will need to gather the burlap to make it fit into the basket. If you prefer, you can take a needle & thread and gather the bottom edge. My mom actually just took and folded/gathered the burlap at the bottom of the basket & glued the pleats together with fabric glue. You can also used hot glue if you want.

4.) You will then need to cut a 15" circle out of the burlap for the bottom of the basket. You will need to fold the outer edge of the circle approximately 1/2" and sew around the edge. Then just place it in the bottom of the basket and hot glue in place covering your gathered edge.
5.) Take the fabric that comes over the top of the basket & see where your handles are & cut the burlap in a straight line following the threads in the burlap. Slip the handles through the opening & then run a line of fabric glue along the opening to prevent fraying. 

6.) To make the ruffle, my mom used a cream muslin fabric measuring 45" wide. She tore the muslin into eight strips 2" wide. She then sewed the strips together & then gathered them down the center to make the ruffle. She hot glued the ruffle to the burlap matching the bottom edge of the ruffle with the edge of the burlap. She then took a piece of lace, gathered it, & hot glued it under the edge of the burlap.

7.) The "CARDS" banner was made using brown paper, stencils, & jute/twine rope. I will be sharing another tutorial for this in the upcoming weeks as we are using these in many different areas of the wedding!


Thank you so much for stopping by & we hope you enjoyed this tutorial!!!

Linking up here....
Tips & Tutorials Tuesday at The Stories of A to Z
Transformation Thursdays at The Shabby Chic Cottage
20 Below Thursdays at Christina's Adventures
Delightfully Inspiring Thursday at Delightful Order
I'm Lovin' it at Tidy Mom
Weekend Wrap-Up Party at Tatertots & Jello
Sunday Showcase Party at Under The Table & Dreaming
 

9 comments:

  1. Lovely basket! You just gave me a wonderful idea of how to alter my colored baskets!

    ReplyDelete
  2. good morning...thanks for sharing...I have this basket...now I'm going to try to make it look like yours.....beautiful!!...xo, M

    ReplyDelete
  3. That is so beautiful!!! What a great idea, I love everything about it.
    xo

    ReplyDelete
  4. Tonya this is so gorgeous! I'm going to have to pin this for my sisters wedding!

    ReplyDelete
  5. This is so pretty! I can't believe how awesome that type basket looks painted!!! I love it!...and am now searching for one of those baskets!! :-)
    gatheredinthekitchen.com

    ReplyDelete
  6. so perfect for an outdoor wedding! love it!

    ReplyDelete
  7. So pretty, I'd definitely use that for lots of other things after the wedding. We are posting about a DIY wedding too. My daughter was married last Saturday and we have lots to show. Stop by if you have time. I know how time consuming working on weddings can be. Happy Weekend!

    ReplyDelete
  8. this is perfect, i have couple baskets that i can work on now. thank you

    ReplyDelete

I LOVE hearing from my readers and I appreciate every single comment left here! If you have a question...I will do my very best to get back with you ASAP!! If your email address is not linked to your blogger account please leave it in your comment so that I may respond to you! Thank you!!

Related Posts Plugin for WordPress, Blogger...

Get Connected!

Follow By Email

Search This Blog

Loading...

Following Along

Join Our Linky Party

Looking For Something?

Woman's Day Feature

Woman's Day Feature
photo credit: Bjorn Wallander

Visit My Sponsors

Grab Button

Love of Family and Home

Blogs I Love...

Related Posts Plugin for WordPress, Blogger...

Labels

25 things (3) 31 Days to Realizing His Love For You (32) advertise (1) anniversary (1) antiques (1) baby showers (1) backyard (7) bathroom makeover (9) Bathrooms (2) beadboard backsplash (1) beadboard wallpaper (4) before/afters (19) birdhouses (1) birthday (5) Blissdom (3) blog conferences (2) blog design (1) blog housekeeping (1) Blog of the Week (3) blue and coral (1) blue furniture (1) board/batten (6) boys bedroom (2) burlap (3) cancun (1) captivating (2) centerpiece (2) chalkboard paint (4) cherry blossom branches (2) Chicago (1) christmas (7) christmas decor (11) Christmas tree (3) cleaning (2) closet makeover (8) closet office (3) crafts (3) Craigslist dresser (3) curb appeal (11) curtains (2) dining (1) dining room (4) disney (2) DIY Advent Calendar (1) DIY chalkboard (2) DIY fireplace mantel (2) DIY Jewelry Hangers (1) DIY wedding (8) DIY Wedding Centerpieces (2) DIY Wedding Slipcovers (1) DIY Wedding Word Banners (1) dollar store (1) dropcloth (1) easter (9) easter tablescape (2) entry nook (1) etsy shop (15) faith (9) fall (7) family (6) fashion (8) father's day (1) feature (1) Fixer Upper (4) flooring (4) flowers (2) formula cans (1) front porches (3) furniture makeover (7) gallery wall (2) garage (1) garden (1) gift ideas (1) gigispetals (4) girls bedrooms (1) giveaway (26) goodwill (5) guest post (3) hair (2) Halloween (1) Happily Ever Before/After (27) hardwood flooring (1) Haven (1) home goals (1) home tour (2) Hooks (1) house of rose (1) How To Wear Coral Denim (1) how to wear mint/aqua denim (1) hydrangeas (1) inspiration (7) inspire me please (15) InstaFriday (5) inverted stacked bob haircut (2) july 4th (2) kirklands (2) kitchen (9) Kitchen Hutch (1) laminate (1) laundry room (9) Letters (2) life insurance movement (1) living room (2) makeovers (11) mantel (7) master bedroom (5) mint/aqua denim (1) mirror (2) Mixing Coral with Navy (2) Mod Podge (11) mommy's day (1) Monogram (3) month in review (2) mother's day (1) my birthday (1) napkin rings (1) News Interview (2) Numbers (2) nursery (5) old doors (1) Organization (11) ornament (1) outdoor rooms (2) painted rug (2) painting (15) pallet art (1) pantry cabinet (2) parker's room (2) parties (8) pergola (1) photography (45) photography props (1) picmonkey (1) pillows (6) pinkEpromise (1) pinterest (4) planters (1) playroom (1) polka dot bungalow (2) polyvore (1) porch swings (1) Pottery Barn (1) printables (1) re-purposing (1) recipes (24) resale (1) ring bearer pillow (1) Rocking Chair (1) Sarah Richardson (2) seattle (2) shared bedroom (1) shelf vignette (1) shopping (2) shower makeover (3) shutters (2) sick house (1) Signs (5) slipcovers (1) sponsors (3) spray paint (4) spring decor (13) storage (4) stuff (1) styling tutorial (1) summer (2) summer mantel (3) tablescapes (3) teacher appreciation (5) thank you (1) tissue paper pom poms (1) Top 10 of 2011 (1) top blog referrers for 2011 (1) tulips (1) tutorials (30) typography (3) vacations (5) valentine's day (6) valentines day (1) vintage fan (1) vintage toys (1) vlogging (14) wall art (1) wall stencil (1) What I Wore... (12) white walls (1) window boxes (4) winner (1) woman's day feature (2) word banners (1) wreaths (7)
 
Designed by Munchkin Land Designs • Copyright 2012 • All Rights Reserved